Yesterday was full of delicious progress.
I still need to figure out the collar, waistband, liner, and invisible zipper situations, but the skeleton is all here.
I had been stuck on the first step.
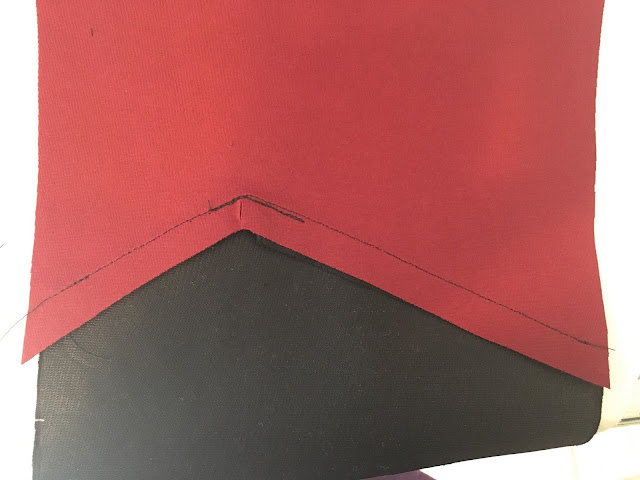
Yeah, the FIRST step. The front chest piece sewn to the front waist piece... in all my practicing on muslin, I could not keep the darn point from puckering. I guess they make it the first step because it's the most important clean line... if you mess it up, you are cutting new cloth and starting over! Finally I went on a hunt to see what other people did for cosplay purposes, and I learned about stay-stitching. I made my seam allowance 1/2", so you sew a line above the point on the red piece just under 1/2", then cut the cloth almost all the way up to that point. Once that corner is separated into 2 flaps, it's far easier to deal with.
Uhhh... like this:
You can see here that I accidentally put it darn close to the seam! I did the same for the back point (on the black though, of course), and kept the stay-stitch to about 3/8" which worked just as well but gave me more of a safety zone. I feel like I should have run into this technique at some point in my last decade of sewing halloween and ren faire costumes.
After I figured out that step, the rest progressed pretty fast, until it was time to assemble the sleeves to the body.
There has to be a better way.
Attaching the sleeves, sleeve inserts (the black triangles), and body together is just ridiculously hard to do on the sewing machine. I really messed up the alignment of the left sleeve inserts, but considering that I can't re-do things with this knit material (it leaves "tears" in the knit if I pick out stitches), I'm just leaving it instead of starting from scratch. I ended up hand-sewing most of the shoulder seams on the right sleeve, and that turned out far better... but still frustratingly far from perfect. He's only going to wear it for a year or two anyway, and there's only 6 days left until we need the costumes, so I'm trying to let go of the perfectionism.
Speaking of which, my husband could theoretically wear his uniform forever, so I need to get all my mistakes out now! I'm desperately hoping that my husband's jacket shoulders are easier to assemble due to being much larger... and also due to not having to improvise a pattern. Wish me luck, I start on his today!
I still need to figure out the collar, waistband, liner, and invisible zipper situations, but the skeleton is all here.
 |
| For my little captain. |
I had been stuck on the first step.
Yeah, the FIRST step. The front chest piece sewn to the front waist piece... in all my practicing on muslin, I could not keep the darn point from puckering. I guess they make it the first step because it's the most important clean line... if you mess it up, you are cutting new cloth and starting over! Finally I went on a hunt to see what other people did for cosplay purposes, and I learned about stay-stitching. I made my seam allowance 1/2", so you sew a line above the point on the red piece just under 1/2", then cut the cloth almost all the way up to that point. Once that corner is separated into 2 flaps, it's far easier to deal with.
Uhhh... like this:
 |
| Stay-stitching experiment. |
You can see here that I accidentally put it darn close to the seam! I did the same for the back point (on the black though, of course), and kept the stay-stitch to about 3/8" which worked just as well but gave me more of a safety zone. I feel like I should have run into this technique at some point in my last decade of sewing halloween and ren faire costumes.
After I figured out that step, the rest progressed pretty fast, until it was time to assemble the sleeves to the body.
There has to be a better way.
Attaching the sleeves, sleeve inserts (the black triangles), and body together is just ridiculously hard to do on the sewing machine. I really messed up the alignment of the left sleeve inserts, but considering that I can't re-do things with this knit material (it leaves "tears" in the knit if I pick out stitches), I'm just leaving it instead of starting from scratch. I ended up hand-sewing most of the shoulder seams on the right sleeve, and that turned out far better... but still frustratingly far from perfect. He's only going to wear it for a year or two anyway, and there's only 6 days left until we need the costumes, so I'm trying to let go of the perfectionism.
Speaking of which, my husband could theoretically wear his uniform forever, so I need to get all my mistakes out now! I'm desperately hoping that my husband's jacket shoulders are easier to assemble due to being much larger... and also due to not having to improvise a pattern. Wish me luck, I start on his today!


